As a patient, you wonder why this is happening. You wonder why you need a revision rhinoplasty 9 months following your initial surgery. You wonder why everything looked great and the next things you notice are pinched nostrils and a progressive nasal obstruction. Well, you are not alone. Whether it’s the result of aggressive surgery or scar contracture with the healing process, this problem is not that rare. Nationally, approximately 5 –12% of patients that undergo rhinoplasty need a revision of some kind, whether it is major or minor. Even in the hands of the best rhinoplasty surgeons across the country, the need for revision sometimes occurs. Without a doubt, revision rhinoplasty surgery is the most challenging procedure that Facial Plastic & Reconstructive Surgeons perform.
Perfecting surgery with this three-dimensional structure (the nose) takes years to master and continues to improve. Little did we know that rhinoplasty maneuvers that were used three years ago could cause disastrous results today. Rhinoplasty surgery is forever evolving! My fellowship director, J. Regan Thomas, MD, told me something that I’ll never forget – "you haven’t learned anything about rhinoplasty until you’ve performed at least a thousand procedures and followed them for many years". This statement epitomizes why fellowships are so valuable. Some of the needed experience and potential pitfalls are circumvented by first hand observing and learning the analysis, judgment, techniques, complication management and most importantly, results from a seasoned rhinoplasty surgeon. This is why I super-specialized in rhinoplasty surgery during my fellowship in Facial Plastic & Reconstructive Surgery. The training catapults you years ahead of many other surgeons that aren’t fortunate to have post-graduate training. Many cosmetic surgeons are taught that aggressive cartilage removal is a procedure of the past. Today’s concept is "less is more". Less cartilage excision, cartilage repositioning, camouflage techniques, structural grafting, and suturing techniques are being taught in most rhinoplasty courses and at our national meetings.
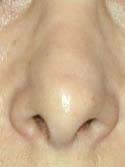 Figure 1
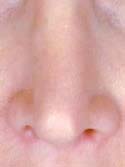 Figure 2
In primary rhinoplasty surgery, the key to preventing complications is the pre-diagnosis of potential anatomical and functional abnormalities. For example, you desire a hump reduction and I identify short nasal bones and a narrow middle vault. My thorough evaluation will warn me that you are at risk for upper lateral cartilage subluxation from the nasal bones (inverted V deformity) (Figure 1) and internal valve collapse. In revision nasal surgery, the previous surgeon missed these telltale potential anatomical abnormalities and now we’re in charge of repairing the complication. We always perform a detailed anatomic and functional evaluation of the nose followed by a diagnosis of the post-operative nasal deformities and/or nasal obstruction. The incidence of post-operative nasal obstruction is approximately 10%1. After the problems and potential complications are identified, we create a surgical plan while studying the preoperative photographs and prepare to use everything in our surgical armamentarium since we must always prepare for the unexpected.
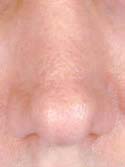 Figure 3
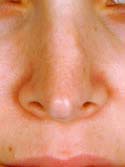 Figure 4
 Figure 6a
Before
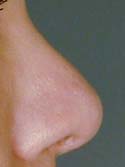 Figure 6b
After
Below is my algorithm for a consultation for revision rhinoplasty in Beverly Hills, revision surgeries comprising approximately 60% of my practice. When the appointment is made, you are asked to bring a copy of your medical records and operative reports from your rhinoplasty surgery or surgeries, in addition to photographs of your nose prior to surgery. If email is an option, we have you send your photos and comments to us before your consultation. Initially, I’ll review your notes and photos while you are discussing surgery with my patient care coordinator, Ana. Next, I perform a detailed history while listening very carefully to your desires. From our conversation, I will interpret whether or not you have realistic expectations. This is by far one of the most important details that I need to attain from your history. What are you unhappy with – a pinched tip (Figures 2–4) or Polly beak deformity (under-resection of the hump just behind the tip) (Figures 6a – Before, 6b – After )? My goal is to find out if I can help you, and to see if you are a good candidate for revision surgery.
Another important detail is to ascertain if you have nasal obstruction. I will determine if the nasal obstruction was present preoperatively. If the obstruction is a result of the surgery, a number of questions need to be answered. Did you have reductive rhinoplasty surgery? I will have you point out where the obstruction is. Is it static or dynamic? Present with normal or deep inspiration? What alleviates and worsens the nasal obstruction? What are the characteristics of the nasal obstruction? Was septal surgery performed? With these important questions answered I am now ready to perform the physical examination.
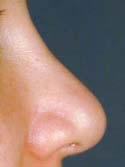 Figure 7a
Pre-operative
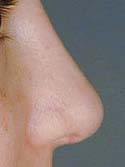 Figure 7b
Post-operative view
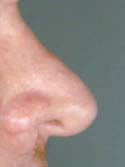 Figure 8a
Pre-operative view
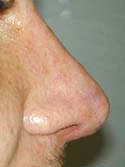 Figure 8b
Post-operative view following dorsal augmentation with Goretex and crushed cartilage and tip deprojection
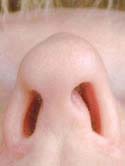 Figure 9a
Basal View – Before
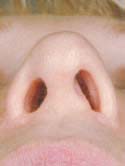 Figure 9b
Nasal View – After, following reconstruction
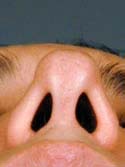 Figure 10a
Nasal View – Before
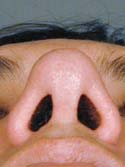 Figure 10b
Nasal View – After Post-operative view following bilateral lateral crural strut reconstruction.
For the physical exam, I use a detailed nasal analysis worksheet. I will perform a detailed visual and tactile evaluation of the nose. For the bony dorsum, I will examine the osteotomies, presence of open roof deformity or rocker deformity, and hump under- or over- resection (Figures 7a – Before, 7b – After and 8a – Before, 8b – After). Then I will examine the middle part of your nose, called the middle vault. I will look for middle vault abnormalities such as a narrow middle vault, inverted V deformity or under-resection of the caudal cartilaginous dorsum (Polly beak deformity). For the tip, I will examine tip projection, rotation, support, alar and columellar retraction, over aggressive Weir incisions, and lower lateral crural characteristics such as over-resection, cephalically oriented or bossae formation (Figures 9a – Before & 9b – After, 10a – Before, 10b – After). Over-resection of the lower lateral cartilage complex in patients with a heavy sebaceous skin-soft tissue envelope can cause tip ptosis and nasal obstruction (Figures 11a – Before, 11b – After & 12a – Before, 12b – After ). This problem often occurs in Hispanic, Asian, Middle Eastern and African-American patients. A deviated cartilaginous dorsum and tip can signify a deviated septum. This is only a partial list of anatomical problems that I need to identify in nasal analysis.
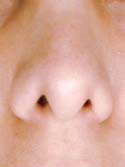 Figure 11a
Before
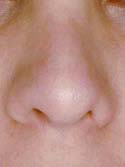 Figure 11b
Post-operative view following tip reconstruction.
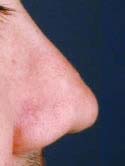 Figure 12a
Before
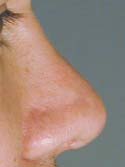 Figure 12b
After
For patients with nasal obstruction, I’ll observe you performing normal and deep inspiration on frontal and basal views. Often, the diagnosis is easily identifiable as supra-alar, alar and/or rim collapse or slit-like nostrils during static or dynamic states. External Valve Collapse (lower lateral cartilage pathology) can be evaluated with the soft end of a cotton swab while plugging the contra-lateral nostril. The cotton swab elevates the area of obstruction whether it’s the alar rim, lower lateral crura or supra-alar region. I will see if the nasal obstruction is alleviated by elevating the nasal tip in patients with ptosis of the nasal tip. I will perform the Cottle maneuver (pulling laterally on the cheek) to check for internal valve collapse. Although this test is generally non-specific, internal nasal valve pathology caused by supra-alar pinching or a narrowed angle between the upper lateral cartilage and septum can be diagnosed. On basal view, I’ll examine the medial crura to identify if they are impinging into the nasal airway. Following a thorough external nasal evaluation, I will examine the inside of your nose. I will examine your nose with a nasal speculum and check the nasal septum for perforations, persistent deviation (Figure 13), and for any remaining cartilaginous remnants to be used for grafting. Other causes of nasal obstruction to identify are: hypertrophic inferior turbinates, synechiae (scar bands) between the lateral nasal wall and septum, nasal masses and middle turbinate abnormalities (concha bullosa).
 Figure 14i
Basal View – Before
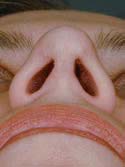 Figure 14j
Nasal View – After Lateral Crural Strut Reconstruction
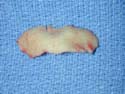 Figure 15a
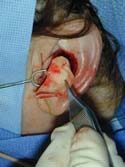 Figure 15b
As I’m examining you, I will create a mental list with solutions followed by documentation on your nasal analysis sheet, such as: 1. External valve collapse secondary to over-resected lower lateral crura with a plan of open rhinoplasty with lateral crural strut grafts ( Figure 14a, b, c, d, e, f, g, h, i – Before, j – After ) using conchal (ear) cartilage ( Figure 15a, b, c, d ), Figure 15d shows a post-operative photo of the ear and ear scar after cartilage has been removed, 2. Internal nasal valve collapse secondary to a narrowed middle vault and supra-alar pinching with moderate inspiration with a plan of bilateral spreader grafts ( Figure 16a, b, c, c2) and supra-alar batten grafts using conchal cartilage, and 3. Bilateral alar retraction with a plan of bilateral conchal composite grafts (See Next Section) . If structural grafting is necessary, I will discuss with you what material may be used, such as remaining septal, ear cartilage or alloplastic grafts (Goretex, Porcine skin or Alloderm). If a blanket of tissue is needed to cover the structural grafting, such as a shield graft, or to add a thin layer of dorsal augmentation, deep temporalis fascia (fig 16d) is an excellent tissue that is easily harvested from a small incision made in the hairline. If ear cartilage is needed, a well-hidden incision is made inside your ear or on the back of your ear with minimal to no post-operative deformities. Before and after photos of frontal views ( Figures 16e- Before, 16f – After )and basal views ( Figures 16g – Before, 16i – Intra-op, 16h – After ), complete internal and external valve reconstruction using bilateral spreader grafts and bilateral lateral strut grafts.
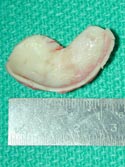 Figure 15c
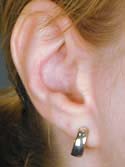 Figure 15d
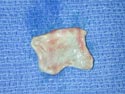 Figure 16d
Deep Temporalis Fascia
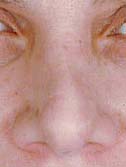 Figure 16e
Frontal View – Before
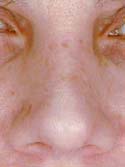 Figure 16f
Frontal View – After
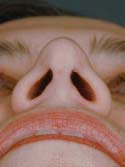 Figure 16g
Basal View – Before
Composite grafts are a combination of skin and cartilage taken from your ear ( Figure 17A) . This graft ( Figure 17B) is then added to the inside of your nose to help correct retracted or notched ala. In simpler terms, the nostrils may pull up following rhinoplasty surgery which will reveal the nostril openings and show too much of your columella. This is a common finding in revision or secondary rhinoplasty surgery. Once the graft is taken from the ear, either the defect (area where the skin/cartilage has been removed) is stitched together (Figure 17C), or in some cases a piece of skin (Full Thickness Skin Graft) is taken from behind your ear and then placed in the defect ( Figure 17D) where your composite graft was removed. This usually heals with minimal to no visible scar ( Figure 17E) . The grafts are inserted into the nostril and with time, will heal and become part of your ala/nostril. Occasionally, the grafts can become swollen up to approximately 3 months and there is a small risk that the graft will not survive for one reason or another.
 Figure 16h
Nasal View – After
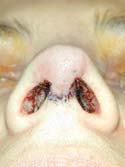 Figure 16i
Nasal View – Intra-op
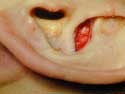 Figure 17a
Composite Graft taken from left ear
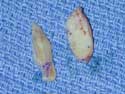 Figure 17b
Composite Grafts
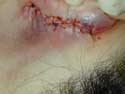 Figure 17e
Behind ear where Full Thickness Skin Graft is Taken
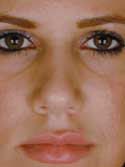 Figure 18a
Cephalically-oriented Lower Lateral Cartilages with collapsing ala.
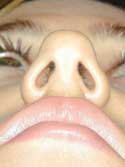 Figure 18b
Buckled or weak lateral alar cartilage causing external valve collapse.
Prior to undergoing rhinoplasty, the orientation of the lower lateral cartilage has to be examined to determine if it’s cephalically- or vertically-positioned ( Figure 18A ). This is often called a parenthesis deformity. The tip cartilage is directed towards the inside corner of the eye instead of the more natural position towards the outer corner of the eye. This malpositioning doesn’t give enough support for the ala, which can cause buckling or pinching of the ala ( Figure 18B ). This may lead to nasal obstruction. If tip cartilage is removed in rhinoplasty surgery with a parenthesis deformity, the tip will lose its natural contour and the nostrils will probably collapse and cause nasal obstruction. To prevent these problems, the tip cartilage has to be released ( Figure 18C ) and then repositioned ( Figure 18D ) to a more horizontal position and reinforced with lateral crural strut grafts.
This is only my initial plan as I’m creating your algorithm for surgery. Guaranteed, it will change as we get closer to surgery. Photo imaging is usually performed which can be extremely useful if you understand that the final image is NOT A GUARANTEE of results. Occasionally, I can identify if you have unrealistic expectations when a conservative image is generated by me and you desire a radical change. If this is the case, I’ll discuss this issue with you and explain why your thoughts may be considered unrealistic. Finally, I will use the computer image as a goal in surgery. Often times, patients will bring photos (models, movie stars, etc.) of what they feel their nose should look like. My goal is to take what you have and make a moderate, and sometimes, significant difference in the appearance and function of your nose, creating an aesthetically pleasing, natural nose.
Following surgery, the majority of patients have minimal pain. I will ask you to clean your incisions and the inside of your nose approximately twice a day. You will be instructed to spray salt water (saline) into your nose with a spray bottle and a baby bulb syringe. Your cast and the stitches will be removed in one week (assuming that you are having an open revision rhinoplasty). For the second week, your nose will be taped. Following the second week, if needed, I will instruct you on how to tape your nose nightly to help reduce the swelling. The most important attribute that you, the patient, can possess following revision nasal surgery is PATIENCE. It may well take one year for the swelling to completely resolve. I can promise you that I will do the best job possible to improve the health of your nose and your spirit.
© Spalding Drive Plastic Surgery. All rights reserved. Digital Marketing & Design by Studio 3 Marketing®